Arch linux installation
Linux is great. No seriously. The creation and development of linux was a revolutionary turning point in the history of computers. Despite its issues and hookups, Linux is one of the building blocks of the modern computer world. The problem is, to use linux you have to install a distro or install from linux source. Distros can sometimes be stupidly annoying, and installing linux from source is PURE HELL. this problem is magnified by the layers of thick walled in-crowd attitude to linux; you need to get linux to use linux. But what if you don't have time for a learning curve? Well, there are some distros that offer a 'from source' experience with the hard bits done for you. all you have to do is install it. Which leads us to the next issue. ALL INSTALLATION GUIDES FOR THESE DISTROS SUCK.
So then, lets make our own. For this guide we will be installing Arch Linux, a lightweight linux distribution that tries to be as simple and straightforward as possible. Shall we get started? Yes? GREAT OFF WE GO!!
Step 1: creating an arch installer
The very first thing you are going to need to do is to create an installer for arch linux. Before you start this step insure you have an 8gb usb flash drive that is formatted with no important information on it. THIS MEANS THAT ANY DATA ON THE DRIVE WILL BE PERMANENTLY DESTROYED. FINITO. NO GETTING IT BACK. ANY DATA ON THE DRIVE IS GONE FOREVER.
If you do not have an empty drive laying about your home, thats no problem! just hop down to a best buy or pc world or even order one next day on amazon. i would reccomend not cheaping out, but you should be able to pick up a good one for under £20 ($25). also, this part requires a large amount of waiting, so find a book or a rubiks cube, along with some snacks to pass the time.
1a]
Before you can install Arch, you need to download it (obviously). You can download it directly from a mirror, or download using a, or using a torrent. To download arch, visit this link.
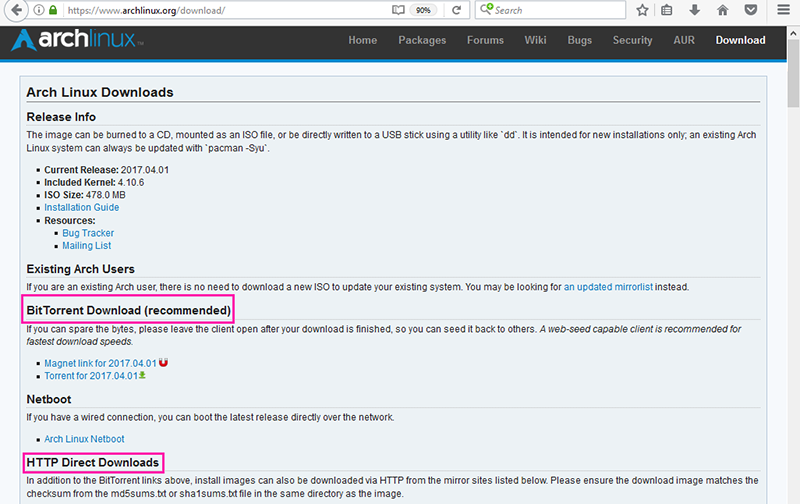
To download Arch from a mirror, scroll down on the arch downloads page to "HTTP Direct Downloads" and find a server hosted in a place near where you are.
Alternativly, you can download arch via torrent. To download Arch via torrent, you need to install a torrent application. one of best multi-platform torrent applications currently is called Tribler. Tribler offers a clean ad-free application with a simple interface. Alternativly, if you already have a torrent application installed, you can skip to the next step. If you don't, install it from here. Once tribler is installed, navigate back to the arch download page and click "magnet link for 20xx.xx.xx" for the latest arch build.
1b]
Once you have the installer, you need to image it to your usb drive. Remove all drives connected to your computer, Insert your usb drive into your computer, and do the following, per platform;--
Windows:
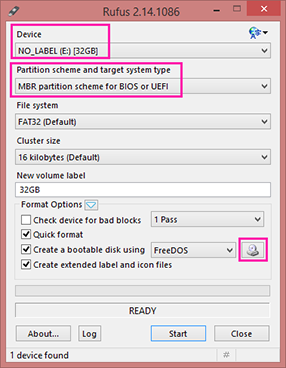
Download a program called Rufus from here and open it. Select your chosen USB drive under the "device" section of the Rufus application. Change partition scheme to "MBR partition scheme for BIOS or UEFI" move down to the small disk icon to the right of the text "create a bootable disk using" and click it. Next, navigate to the file location in which you saved the arch install disk, and open the install ISO file. Now, click start.
OS X:
Open a new terminal window and type diskutil list. The terminal will return all of
the disks connected to your computer. Locate your usb drive on the list by finding the drive with the
same capacity, and find its drive handle (it will have the format "disk[X]s[Y]", eg
disk2s1). Once you have its drive handle, type the following command into the console:
sudo dd if=path/to/arch.iso of=/dev/[drive_handle] bs=1m. For example, if your drive
handle was disk2s1, enter sudo dd if=path/to/arch.iso of=/dev/disk2s1 bs=1m.
Now all you have to do is sit down and wait. This may take a while. Time to open up them snacks..
Step 2: booting the installer
Once you have finished creating the installer, its time to.. well.. install it. This bit can get a little difficult so if you screw it up the first time don't get dis-heartened, Just try again till you get it! This step requires you to format your boot drive, so make sure you back up all data from your operating system before continuing. Having more than one disk installed in your computer it may be difficult to identify your boot drive. If you have multiple drives of similar capacity and dont want to play russian roulette with your data, unplug all extra drives or disable them in your BIOS/EFI.
2a]
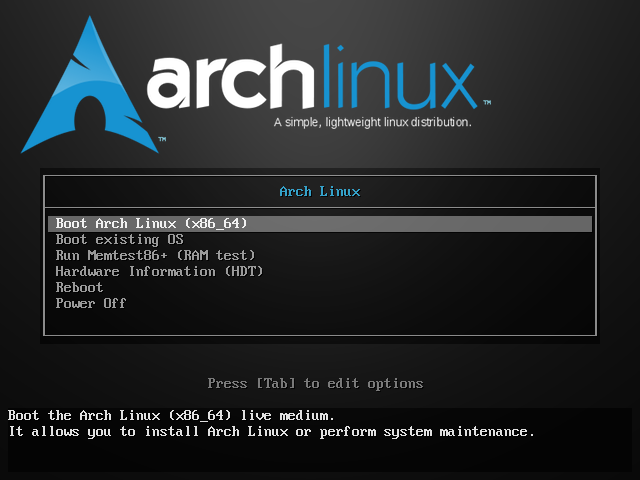
Boot into the usb drive through your BIOS/EFI. You should now be presented with a splash screen containing an Arch Linux logo, and a bunch of options. Boot Arch by selecting "boot Arch Linux" and pressing enter. The splash screen should clear and the installer will proceed to boot.
Depending on the speed of your usb drive, this boot process may take some time; dont panic, or press any
buttons until you reach a terminal. If the installer does not boot within 5-10 minutes it is likely your
installer is damaged, meaning you need to start over, possibly with a different flash drive. your installer
has finished booting once it reaches a screen with root@archiso ~# and a blinking cursor.
2b]
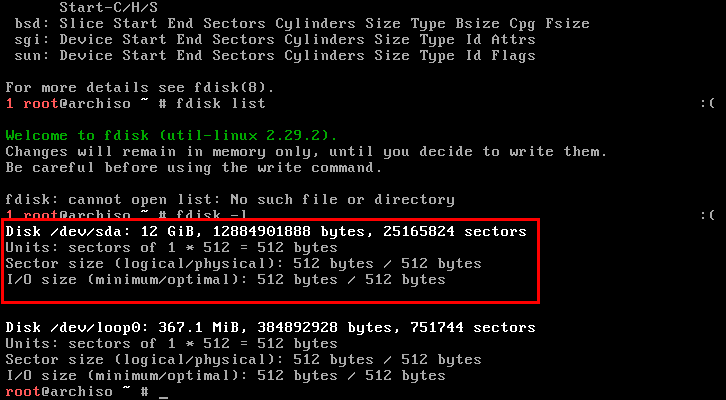
Once you have booted, the first thing you need to do is to mount your computers disk drive. type:
fdisk -l. Identify your computers internal disk by its size (or example, this installations
target drive is 12GiB). Note down its drive handle, you will need this through your installation process.
In this guide, the drive handle is /dev/sdX, and from this point you must change sdX
to your own drive handle. For instance, if your handle is sdb, every time
sdX is referanced, change it to sdb, every time sdX2 is referanced,
change it to sdb2, and so on for all uses of the drive handle.
step 3: partitioning your drive
Your boot disk needs to be partitioned and formatted for an Arch installation. Identify whether your computer uses UEFI/ESP, or BIOS/MBR style partitioning. This guide will use three partitions; one for boot, one as a root, and one as a share. More complex installations break down these partitions further for various reasons, but that is not needed to achieve a fully working arch installation. Network access must also be enabled to allow installation of packages.
3a]
I have an UEFI/ESP computer:
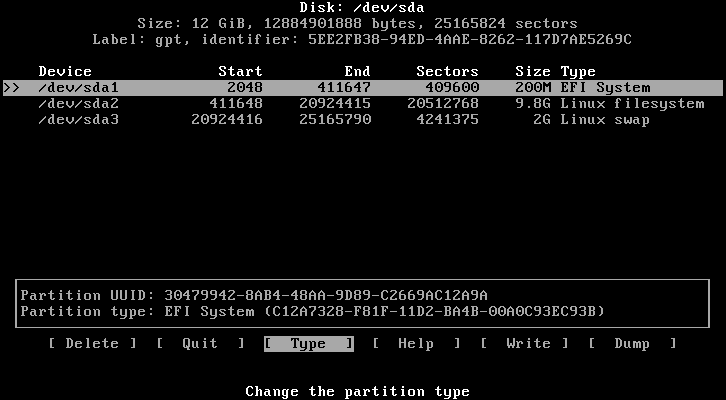
Open cfdisk targetting your drive with cfdisk /dev/sdX. If you are prompted to select a
label type, choose GPT. You will enter into a simple command line GUI. Select [new] using
the arrow keys and press enter. When asked for the partition size, enter 200M. This 1st partition
is used for the drives EFI boot sector. Highlight [Type] and press enter. Use the arrow keys to
scroll through the list and change the type to EFI System.Next, press down to highlight
Free Space, Select [new] and press enter again. When asked for the partition size,
enter the remaining space, -2G; for example, if you have 15.5G left, enter 13.5G.
Press down to highlight Free space, select [new] and press enter twice. Highlight
[Type] and press enter. use the arrow keys to scroll through the list and change the type to
Linux swap.
I have an BIOS/MBR computer:

open cfdisk targetting your drive with cfdisk /dev/sdX. If you are prompted to
select a label type, choose DOS. You will enter into a simple command line GUI.
Select [new] using the arrow keys and press enter. When asked for the partition size,
enter 200M., then select primary.This 1st partition is used for the
linux bootloader. Select [Bootable] and press enter. this will allow your computer
to boot from this partition.
Next, press down to highlight Free Space, Select [new] and press enter
again. When asked for the partition size, enter the remaining space, -2G; for example, if you have
15.5G left, enter 13.5G. Press down to highlight Free space,
select [new] and press enter twice. Highlight [Type] and press enter.
use the arrow keys to scroll through the list and change the type to Linux swap.
Once configured, Select [Write] to apply the changes. It will ask you to confirm these
changes, type yes. Then, select [Quit] to be taken back to the terminal.
3b]
Now your partitions have been created, they must be formatted. enter the following commands:
          mkfs.fat /dev/sdX1
          mkfs.ext4 /dev/sdX2
          mkdir /mnt
          mkdir /mnt/boot
          mount /dev/sdX2 /mnt
          mount /dev/sdX1 /mnt/boot
This will format your drive and mount the partitions ready for installation.
Step 4: Configuring the installer
First, enter timedatectl set-ntp true to update the system clock. Connect
your computer to the internet using a wired ethernet cable; this is reccomended as
your ethernet port should be enabled by default by the arch installer, and also removes
the need to waste time configuring a wireless radio & network connection.
Once connected, verify your internet access by entering ping 8.8.8.8 -c 5. If
you recive the error Destination Host Unreachable your computer cannot connect
to the internet. to fix this, follow these steps.
Check ISP connection:
First, check that your router and internet connection is fully working on a different device, like your phone. If not, you probably want to call up your ISP. If it is, your computer is most likely the issue.
Enable network device:
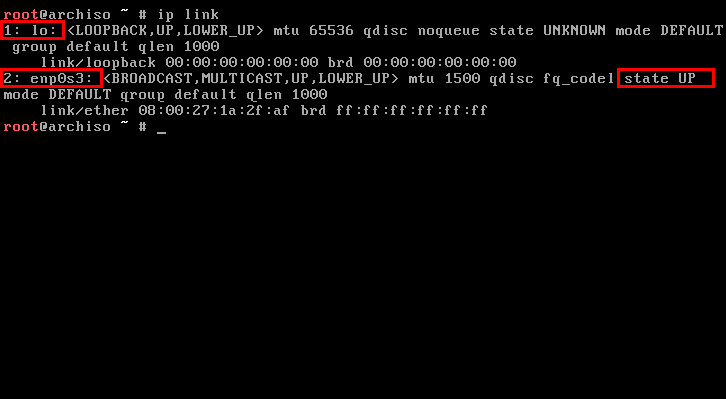
Go back to your installer and type ip link taking a note of the
available interfaces. common names include enp0s3 and wlan0.
These names can vary, but you will most likely have a couple. Check if any of the
interfaces have their state set to DOWN. if an interface is set to DOWN it means it is
disabled by linux and needs to be re-enabled. For example if the interface enp0s3 was set
to down then you would Use the following command to set it to turn it back on:
ifconfig enp0s3 UP. Just replace enp0s3 with whatever interface you have
that is DOWN.
Enable dhcpcd:
You may need to enable dhcpcd to allow your computer to connect to a network.
simply use enter systemctl start dhcpcd.service
Step 5: Installing arch
You are now ready to install arch! Congratulations, give yourself a pat on the back. You now need to install the base arch packages, arch dependancies and common linux apps.
5a
The first step is to setup swap and install the base system. Enter the following commands:
        mkswap /dev/sdX3
        swapon /dev/sdX3
        pacstrap /mnt base
The final command will most likely take a some time. Get to those snacks you got earlier or go do something else for a while.
5b
Once pacstrap has finished you have officially installed arch! Congrats! Pat yourself on the back. you deserve it. Right enough of that you've got more instructions to finish up the installation.
Enter the command genfstab /mnt >> /mnt/etc/fstab to generate an fstab file.
Then enter arch-chroot /mnt to enter your arch installation. Set the timezone by
typing ln -sf /usr/share/zoneinfo/[Region]/[City] /etc/localtime where Region is
your region of your timezone and City is the city of your timezone; for example, to set the
timezone to London, enter ln -sf /usr/share/zoneinfo/Europe/London /etc/localtime.
Common timezones include:
- Canada/Central
- Canada/Pacific
- Canada/Eastern
- America/New_York
- America/Chicago
- America/New_York
- America/Los_Angeles
- Europe/London
- Europe/Ameterdam
- Europe/Moscow
- Europe/Paris
- Europe/Dublin
- Europe/Madrid
5c
Enter pacman -Sy nano sudo grub intel-ucode linux-headers to install some
essential packages. Set your system language by typing nano /etc/locale.gen.
search through the file until you find your system language, and delete the #
in front of it. Press CTRL + O then enter to save your changes then CTRL + X to exit nano.
If you dont know which system language your keyboard uses, the most common types include:
- English Great Britan:
en_GB.UTF-8 UTF-8 - English Australian:
en_AU.UTF-8 UTF-8 - English US:
en_US.UTF-8 UTF-8 - French:
fr_FR.UTF-8 UTF-8 - Spanish:
es_ES.UTF-8 UTF-8
An extensive list of the different locales can be found
here.
Once you have selected your locale, run locale-gen to generate a new locale.
You will also need to
delete the hashtag in front of en_US.UTF-8 UTF-8 for compatability.
Set the new system language by opening nano /etc/locale.conf and entering
LANG=[locale] where LANG is your preferred system locale. for example,
LANG=en_GB.UTF-8 would set they system language to English (Great Britan)
Press CTRL + O then enter to save your changes then CTRL + X to exit nano. If you need to
change your keyboard layout, enter nano /etc/vconsole.conf and enter
KEYMAP=[keymap] where keymap is your required keymap. To change to a UK
layout, enter KEYMAP=uk. here is a list of common keymaps:
- PC UK:
uk - Mac UK:
mac-uk - PC US:
us - Mac US:
mac-us - PC Spanish:
es - Mac Spanish:
mac-es - PC French:
fr - Mac French:
mac-fr
5e
Finally, configure the hardware clock by entering hwclock --hctosys
and enable networking by entering systemctl enable dhcpcd.service
Step 6: Installing the bootloader
A bootloader is required for you to be able to boot into your new arch installation. A bootloader is used to load arch from your disk drive, and to start arch. The grub bootloader will be installed.
6a
The bootloader installation process differs based on your installation type. Follow the method for your corrisponding installation.
I have an UEFI/ESP computer:
To install the bootloader, Enter the following commands:
          packman -Sy efibootmgr
          grub-install --target=x86_64-efi --efi-directory=/boot --bootloader-id=grub
          mkinitcpio -p linux
          grub-mkconfig -o /boot/grub/grub.cfg
I have an BIOS/MBR computer:
To install the bootloader, Enter the following commands:
          grub-install /dev/sdX
          mkinitcpio -p linux
          grub-mkconfig -o /boot/grub/grub.cfg
6b
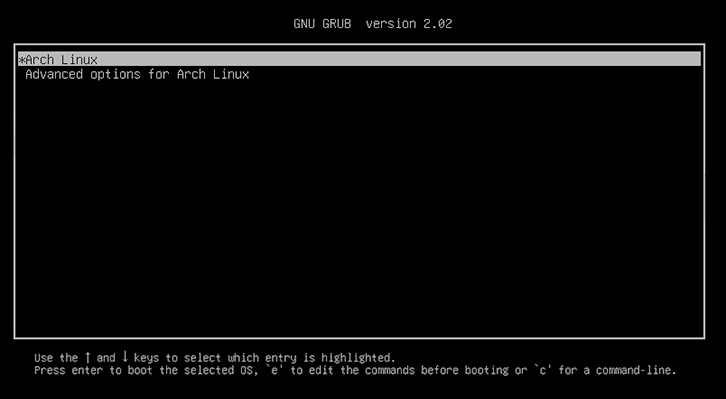
Now it's time to reboot your arch installation. Enter exit then
shutdown -h now. Unplug your arch installer drive and turn your
computer back on. You should be met with a GRUB bootloader interface. Press
enter to boot into your arch installation. Once you reach the login screen,
login as root by entering root and pressing enter.
6c
If your installation is 64-bit, you must enter the following commands to enable the installation of 32-bit software:
perl -0777 -i -pe 's/#\[multilib\]\n#/\[multilib\]\n/' /etc/pacman.conf
To add a user to your installation, enter
useradd -m -G wheel -s /bin/bash [username] where username is your
desired account username. Set a root password by typing passwd
followed by your desired root password. It is important that this password is
strong and secure; write it down if you need to. Next, enter
passwd [username] where userame is your previous account username you just
created to set the password for your new user account. Enter
perl -i -pe 's/# %wheel/%wheel/' /etc/sudoers to add group wheel to sudoers,
then enter logout to logout of root and return to your login screen,
which you can use to log into your new account.
Congratulations! you have successfully installed arch onto your computer. At this point, if you only need a command line installation, you can finish up here. If you need a desktop, sound, utilities, usability modifications and pretty much everything that makes an operating system useful, you going to need to keep going.
Step 7: Installing applications & utilities
Your arch installation is ready for a desktop environment. this section will take you through the process of setting up audio, enabling graphics drivers, windowed applications and computer utilities.
Important notice for virtual machine users only!
If you are installing arch onto a virtual machine it is important you also install the virtual machine packages to allow the virtual machine to run properly. Do the following based on your virtual machine:
Virtualbox:
If you are installing Arch on a virtualbox system, you must installits dependancies by typing:
          pacman -Sy virtualbox
          systemctl start systemd-modules-load
when asked to choose between virtualbox-host-modules-arch and
virtualbox-host-dkms, choose virtualbox-host-modules-arch.
If you have installed arch in EFI enabled mode and upon reboot installation does not boot,
enter edit startup.nsh to the efi shell. This will open an editor; into the
editor type:
          FS0:
          \EFI\grub\grubx64.efi
This edit is case sensitve. Once finished, press CTRL + q to quit. when prompted to save, press y.
VMware:
If you are installing Arch on a VMware system, you must installits dependancies by typing:
pacman -Sy open-vm-tools
7a
Reboot your computer by entering reboot. Once your computer has rebooted
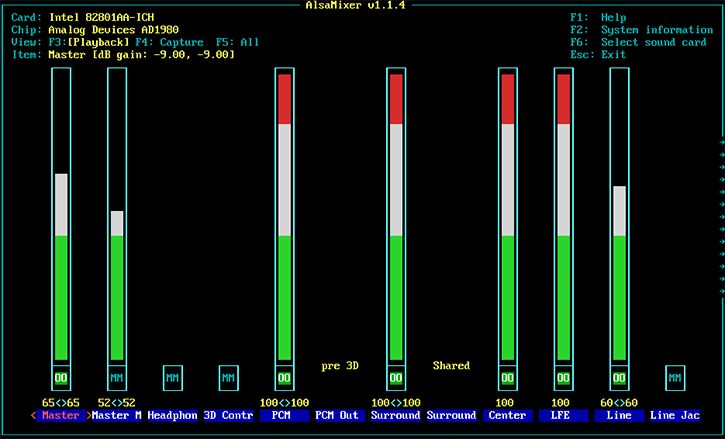
back into arch, login as root. To enable sound, install the alsa mixer by entering
pacman -Sy alsa-utils. If you want to unmute your audio, enter
alsamixer. Once open, scroll through each audio device with the left and
right arrow keys. press up and down to change their settings, and press M
to mute or unmute a channel. The characters MM in a box under a slider
indicate the channel is muted, wheras the characters OO indicate it is
unmuted. Press escape to exit the mixer. Test your audio playback by entering
speaker-test -c 2 -l 2
7b
your computer now needs video drivers before you can continue. enter the following
command lspci -k | grep -A 2 -E "(VGA|3D)". The command will return
the make and model of your graphics processor. Do the following based on which
processor you have.
I have a NVIDIA processor
Determine which model of NVIDIA processor you have using the following resources:
If you have any geforce card from the 400 series upwards, enter
Pacman -Sy nvidia nvidia-utils. If you have a Geforce 8000,9000, ION,
100-300 card, enter Pacman -Sy nvidia-340xx nvidia-340xx-utils.
If you have a GeForce 6000/7000 series card, enter
Pacman -Sy nvidia-304xx nvidia-304xx-utils.
I have an Intel processor
Install the xf86-intel package to allow 3D acceleration. Enter
pacman -Sy xf86-video-intel mesa.
I have an ATI/AMD processor
Install the xf86-ati package to allow 2D acceleration. Enter
pacman -Sy xf86-video-ati mesa.
I have a different processor
Install the vesa package to enable arch to work on generic hardware. Enter
pacman -Sy xf86-video-vesa mesa.
7c
Once your graphics driver is configured, it is time to install a desktop environment. Pretty much all linux desktop environments use an xorg windows system, so this needs to be installed and configured. Enter the following:
          pacman -Sy xorg-server xorg-apps xorg-xinit xorg-twm
          pacman -Sy xorg-server-xephyr xorg-xinit ttf-dejavu
When prompted to choose a library, enter the corrisponding library to the driver you installed for your NVIDIA processor, or enter 1 if you are using ATI / intel / any other graphics processor.
7d
A display manager is needed to be able to switch between desktops and login to your computer using a gui. One of the easiest display managers to use is LightDM. It allows a user to switch between multiple desktop environments. Install LightDM by entering:
          pacman -Sy lightdm lightdm-gtk-greeter lightdm-gtk-greeter-settings
          systemctl enable lightdm.service
IMPORTANT: DO NOT REBOOT YOUR COMPUTER UNTILL YOU COMPLETE THE NEXT STEP. IF YOU DO, YOU'RE GOING TO HAVE A BAD TIME.
7e
Once your display manager is installed, you need to install a desktop manager. For the sake of choice, you will be installing multiple desktop managers for you to try out. To install the desktop managers, enter the following commands:
          pacman -Sy mate mate-extra
          pacman -Sy xfce4 xfxe4-goodies
          pacman -Sy cinnamon
          pacman -Sy kde
          pacman -Sy lxde
          pacman -Sy gnome gnome-extra
          pacman -Sy budgie-desktop
7f
Now is time to install some common desktop applications for you to use. enter the following:
          pacman -Sy firefox
          pacman -Sy chromium
          pacman -Sy vlc
          pacman -Sy libreoffice-fresh
          pacman -Sy pinta
          pacman -Sy spotify
          pacman -Sy audacity
          pacman -Sy handbrake
          pacman -Sy obs-studio
          pacman -Sy gnokii
          pacman -Sy gvfs-afc
          pacman -Sy yakuake
Step 8: Reboot and enjoy
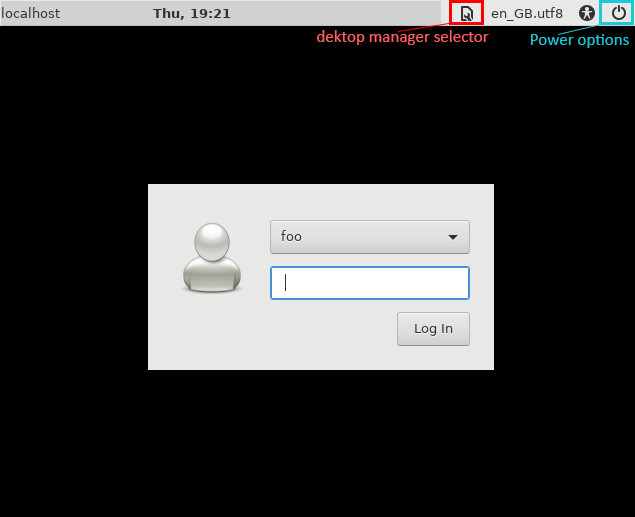
The installation is complete. Reboot your computer to start using arch. you can also
set your computers hostname by entering hostnamectl set-hostname [hostname]
where hostname is your preferred hostname. For example, to set your computers hostname
to foo, enter hostnamectl set-hostname foo. A computers hostname is used
to identify it on a network. It is not necessary to set, but it doesnt hurt to set
one either.
Changelog
2018-07-14
Some grammatical fixes and corrections.